We are going to build our first simple Hello World solution that would return an dynamic greeting. you would need to understand how to use the WID tool and in the various concepts. Though the application we are building is simple, let’s start looking at it from a solution point of view. So the requirements for our first application are:
- It should be capable of getting user input and more specifically their first name, last name, and age
- It should return a customized greeting based on their age
°°Ages 25 and younger it should return—”What’s up <name>!”
°°Ages 26 to 65 it should return—”What’s happening, <name>!”
°°Ages 65 and above it should return—”Good Day to you <name>!”
The solution should be exposed via Web Services
This is a very simple application that could be written in a few lines of Java code or any other programming language. But the point here is to build this as your first WID application using business process (BPEL) components that will allow you to understand the various features of WID and how to use them. Now having given the requirements, there is a capability in WID that you can make use of to organize multiple modules, mediation modules, libraries, and other dependent projects into one scope. This capability is called Integration Solution. It provides a diagrammatic representation of how modules, mediation modules, libraries, and other dependent projects are connected or inter-connected.
| Please note, Integration Solution is a development time concept only and the servers does not know about them. The servers still will view an integration solution as a set of .ear files. |
Let me first give you a ten-step, high-level to plan to build our first Hello World module. As we proceed we will work on each step in more detail. It is important for you to gain an understanding for the high level before executing it. Don’t panic and try to do all these steps now; we will be covering each of these steps in detail as we proceed with this section.
Start WID and switch to Business Integration perspective.
- Create an Integration Solution named Greeting_Solution.
- Create a Library project named GreetingLibrary. Create Business Objects and Interfaces in the GreetingLibrary for the initial BPEL component we will specify in step 5 and implement in step 6.
- Create a Module project named Greeting and add as project reference the Library created in step 1.
- Add Module and Library to the Integration Solution as project references.
- Create and wire the BPEL component.
- Implement the BPEL component.
- Add Web Service and SCA exports to the BPEL component.
- Test the Module.
- Deploy the Module to the WebSphere Process Server.
To start, let’s open WID From the Start menu select Start | Programs | IBM WebSphere Integration Developer | IBM WebSphere Integration Developer.
When WID starts it will ask you for a workspace location. Let’s specify it as C:\ workspaces\FirstProcess.
On the Welcome page click on the arrow next to Go to the Business Integration perspective in the top right-hand corner to start using WID.
Creating the Integration Solution
In a Business Integration perspective, within the Integration Solution section, click on the New Integration Solution. Give the name. Enable the Focus the new integration solution in the Business Integration view check-box. Click on the Finish button.
Creating library project
Now that a solution has been created, you can proceed to create the libraries required for this solution. A library project is used to store these resources that are required by other projects and hence has reuse potential. Libraries contain:
- Business Objects
- Interfaces
- Transformations
- Mediation Subflows
Once you create a library project, it can be added as a dependency in the module or a mediation module project. A library cannot be deployed by itself to WPS or WESB. But you can add a library to the module and select to deploy it with the module option. There can be nested library dependencies also meaning library-A can be dependent on library-B.
In the Business Integration perspective, within the Projects section:
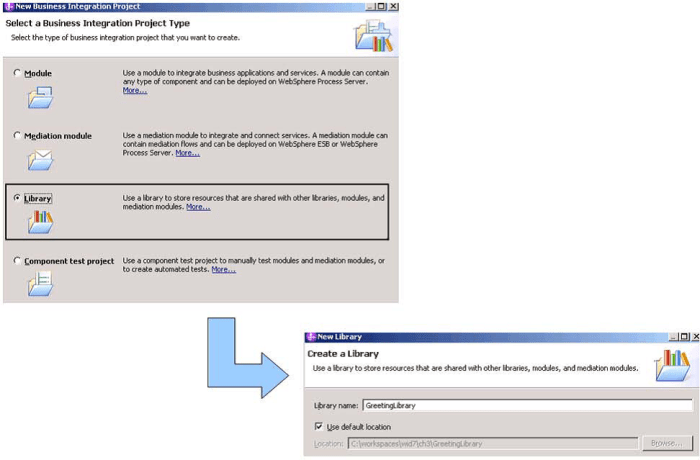
- Click on New Business Integration project and select Library from the wizard menu.
- Give the Library name as GreetingLibrary.
- Proceed to next and by default you should see the library being included in the Greeting_Solution Integration Solution.
- Click on the Finish button.
The new library is created, and you can view the structure of the library project in the Business Integration view.
Creating and visualizing Business Objects
Business Objects (BO) represent one of the fundamental building blocks of a Business Integration solution. They represent the data payload that is being passed back and forth between the various services and hence components. Using WID you can create and visualize these BO using the business object editor. Since we have the intention of sharing the business object among modules, we will create it in the GreetingLibrary library. To create a Party business object in the GreetingLibrary, follow these steps:
- Right-click on the Data Types folder and select New | Business Object from the context menu.
- Give the Business Object the name Party. Give the folder name com/bo and then click on Finish.
Once you do this, the Party BO will be created in the Data Type root folder (further under the folder structure com / bo) and then opened and presented in the BO Editor.
Now let’s add fields/elements to the Party BO. With the business object editor, you can add, delete, and reorder fields and change the type of a field. To add a simple field to the business object, do the following:
- In the business object editor, click the Add a field to a business object icon.
- Replace the default name, field1, with the name of the field (that is, FirstName), as shown in the following figure.
- Add two more fields; LastName and Location. If you notice this, by default all of the above fields will have a type xsd:string.
- Add one more field Age and change the type to xsd:int, by clicking on String and selecting the xsd:int type. This will then enable a field which will represent the age of the person and store it as integer type.
- Save and close the BO Editor.
| You can save in WID using Ctrl+S or you can save all unsaved content using Ctrl+Shift+S. |
Creating and visualizing interfaces
Every component in a module will have to be specified with interfaces. The interfaces specify the inputs and outputs of each component and hence determine which data can be passed from one component to another. An interface is created independently from the implementation of the component and can also be created for a component which has no implementation (implementation is done later). To create a HandleGreetingMessage Interface in the GreetingLibrary do the following:
- Right-click on the Interfaces folder and select New | Interface from the context menu.
- Provide a name for the folder as com /interfaces and name the interface as HandleGreetingMessage and click on the Finish button. Once you do this, the interface will be created in the Interfaces and then automatically opened and presented in the Interface Editor.
- You will notice that there are no operations in the interface. The next task is to add operations and specify the appropriate inputs and outputs. To add a new operation and parameters to the interface, in the interface editor, click the Add Request Response Operation icon.
- Change the operation name to returnGreeting. Note that you can also add additional inputs, output fields, and also a Fault section.
- Change the Input(s) name with a meaningful name like inputPartyInfo. You can also change the name of this field in the Properties view. Click on the string value in the Type field. Then, scroll down and select the Party business object.
- Change the Output(s) name to outputGreetingMessage and leave the type to be string. Save and close the interface editor. The following diagram recaps the preceding steps taken to implement a new interface called HandleGreetingMessage.
Creating the Hello Process BPEL
All the common assets like the interface and business object have been created in the library. Next you will create the solution called Hello Process BPEL. In order to create a Hello process BPEL you will need to:
- Create a new module called Greetings.
- Create a new business process component named HelloProcess.
- Implement the HelloProcess process.
Now let’s take a closer look at each step.
Creating a new module called HelloProcess
The first step is to create a module to define our solution. In Business Integration perspective, within the Projects section:
- Right-click on New and select Module from the context menu. Give the Module name as Greetings.
- Proceed to next and select GreetingLibrary under Libraries list.
- Proceed to next and check Select an Integrated solution focused on
Greeting_Solution and then click on the Finish button.
Creating a business process component HelloProcess
After the module has been defined, create a business process component named HelloProcess for the solution. In Business Integration perspective, within the Projects section:
- Right-click on Greetings | New and select Business Process from the context menu.
- Give the folder name as com / process and the name HelloProcess.
- Proceed to next and select the process type as microflow.
- Proceed to next and enable the Select an interface radio button, browse and select the HandleGreetingMessage interface.
- Click on the Finish button. The Process Editor window will open to enable you to edit and implement HelloProcess. The steps are detailed in the following diagram:
Implementing the HelloProcess process
Now we will start implementing the BPEL process component. Here are the steps to implement the business process:
- In the business process editor, from the palette select the “Choice” activity and drag and drop it to the business process editor between the Receive and Reply activities.
- Replace the default Display Name with the name “CheckPartyAge”. The Display Name field can also be changed in the Description section of the Properties view; a change of the display name will as well update the Name field. Now let’s add case statements, each checking and handling a particular age range.
- Click on the Case activity within the Choice activity scope, and in the Properties view, give the name for this case as “LessThan25”. Click on the Details tab and choose the expression language to be of type XPath 1.0. Here we will write an XPath expression to check the age of the party. Using an XPath expression you will be able to reference parts of the variables or business objects of a BPEL. An XPath expression may reference simple data types (for example. strings and integers) as well as complex data types. In our case we will check the Age in the Party business object that comes as an input to the business process (remember we set this as the input when we defined the interface and operation). The XPath expression can will be $inputPartyInfo/Age <= ’25’.
- Under this Case element, drag-and-drop a snippet from the palette and name it “SayGreeting-WhatsUp”. The visual snippet editor displays a diagrammatic representation of the Java and let’s you graphically create and manipulate snippets of Java code. In the visual snippet canvas you can assemble various out-of-the-box activities that WID provides to compose your visual snippet. WID provides many commonly-used snippets as part of the product and as shown next. You can also refer to methods from custom Java classes/libraries in the visual snippet.
- Under the Properties view for this snippet, we will compose a visual snippet expression as shown in the following screenshot:

- Now we will add one more case by clicking on the CheckPartyAge choice activity and in the action bar that appears, clicking on Add Case element. We will name this MoreThan25LessThan65. The XPath expression will be ($inputPartyInfo/Age >= ’26’) and ($inputPartyInfo/Age <= ’65’). We will repeat what we did in step 5 by adding a visual snippet named “SayGreetingWhatsHappening” and an associated expression which will look as shown in the following screenshot:

- Then add an otherwise element (for over 65) and add an expression as shown in the following screenshot:

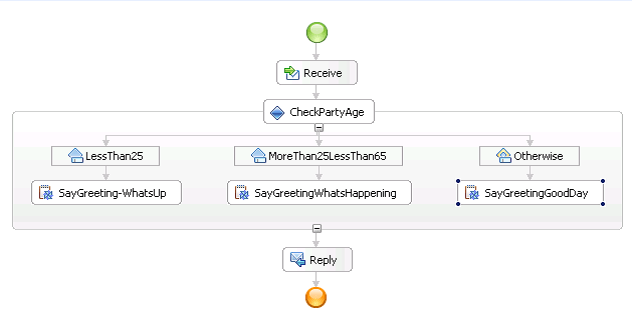
- Save all your settings. This completes the implementation of the process.
- Finally, your BPEL process will look as shown in the following screenshot:
This brings us to the next step where you will learn how to assemble the SCA solution and expose (via export) the BPEL process as a Web Service. Remember that Web Service is one of the many options WID makes available to you.
To expose the process as a web service, here are the steps to follow:
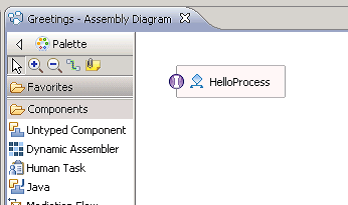
- Double-click on Assembly Diagrams under Greetings project.
- Drag HelloProcess business process component to the assembly diagram and it will appear in the assembly diagram canvas as shown in the following screenshot:
- Right-click on HelloProcess, select Generate Export | Web Service Binding, select the default transport protocol as SOAP 1.1/HTTP using JAX-RPC, and then click on the OK button.
- Save the assembly diagram and after doing the above, your assembly diagram would appear as shown in the following screenshot:

Congratulations! You have assembled and implemented your very first integration solution. Next you need to test this solution.
Testing modules and components
In the previous chapter when we installed WID, we also installed the WebSphere test environment that provided an embedded version of WebSphere Process Server to enable the developers quickly test their applications. With WID, you can test your modules by performing either unit testing or component testing. In unit testing, you choose the components and interfaces that contain the operations that you want to test, then you test the operations one at a time in the integration test client.
Deploying the modules
We will now deploy the Greetings module on your WPS test environment. In Servers view
- After the server has been started, which may take a few minutes, right-click on WebSphere Process Server v7.0 at localhost, and select Add and Remove Projects.
- As shown in following figure, select GreetingsApp. Click on the Add button and then click on the Finish button.
Executing the modules
After deploying the modules, the next step is to execute the modules. We will use the integration test client to unit test the Greetings modules and more specifically test the interface operations of the HelloProcess component.
- To test the component, go to the assembly diagram and right-click on the web service export and click Test Component.
- As shown in the following screenshot, this will launch the Integration Test Client where you can specify the component, interface to test, and the values to be used for different unit test cases.
